Simple advice for a better life.

stuffed-green-peppersGreen Peppers are one of those vegetables that taste great raw, or cooked.  I like all color peppers, green, red, orange, yellow, as a raw vegetable used in salads, or with dips.   I also would like to share this recipe for peppers served hot, as a main meal, or a side dish.  Peppers, like cabbage rolls, may be stuffed with meat, or vegetable stuffing, so I selected the vegetable stuffing for this recipe.

Ingredients:

  • 4 green peppers
  • 3 Tbs. onions, chopped
  • 2 Tbs. canola oil, or vegetable oil
  • 1 cup cooked rice
  • 2 cups vegetable broth
  • 8 oz fresh mushrooms, chopped
  • 2 garlic cloves, chopped
  • ¼ tsp. Italian seasoning
  • Salt and pepper to taste

Directions:

  1. Rinse the peppers under warm running water.
  2. Cut a slice from a stem end of each pepper (about ½ inch thick).
  3. Remove the core, white veins, and seeds.
  4. Fill a medium size pot with water and bring to boil.
  5. Place the peppers, and the tops, into the boiling water and cook for 5 minutes.
  6. Remove peppers and cool.
  7. Arrange peppers in a shallow baking dish.
  8. Sauté chopped onions in canola oil to a golden color.
  9. Add mushrooms and garlic, and sauté for 3 minutes.
  10. Mix the rice and mushrooms, and season with Italian seasoning, salt and pepper, to taste.
  11. Fill the peppers with the rice filling.
  12. Place the pepper top slices over the filling.
  13. Pour ¼ cup of vegetable broth into each pepper, and pour the remaining broth into the pan.
  14. Bake uncovered, at 350 degrees F, for 30 minutes.

TIP: If you prefer to stuff peppers with other vegetables, rather than mushrooms, then you might want to use tomato juice in place of the vegetable broth, to
enhance the flavor. I personally do not like the combination of tomato juice and mushrooms/rice filling.

Pysanka by Gucci – Art and Style Go Hand-In-Hand

You might be thinking…….more Pysanka stories……well, think again.
You are partially correct, but this one is very special.

I read this article about Gucci style, and was so amazed by it, that I just had to share it with all of you…. my devoted web readers

You really do not want to miss this beautiful incorporation of art into style, so please read Pysanka by Gucci-Trend de la crème, and share your thoughts in my comments section.

Can’t wait to hear from you ♥♥♥

Cabbage Rolls – Vegetarian Recipe & Technique

cabbage-rollsMost of you already are familiar with Cabbage Rolls, but to Eastern European cooks, they are known as Holupki, Holubtsi, or Golabki.   All Cabbage Rolls may look the same, yet be very different, depending on the filling used to prepare them. The most popular filling consists of cooked rice mixed with ground beef, turkey, or meatloaf mix, and spices; however you can also use rice or buckwheat mixed with mushrooms, mashed potatoes, or a vegetarian filling, which I will introduce in this recipe. Cabbage Rolls are not the easiest dish to prepare, since it requires a lot of prep work beforehand, especially the cabbage, but if you love them, it’s well worth the effort.

Ingredients:

  • 1 medium size cabbage head
  • 11/2 Tbs. vegetable oil
  • 1 onion, chopped
  • 1 clove garlic, minced (I use a garlic chopper)
  • 1 tsp. dried oregano
  • ½ tsp. dried thyme
  • ¼ tsp. caraway seed, crushed (optional)
  • 1 cup long grain rice
  • 2 cups vegetable stock
  • 1 carrot, grated
  • 1 zucchini, grated
  • ¼ tsp. salt and pepper, or to taste
  • 1 lb. sauerkraut, slightly rinsed out and drained (optional – see tip below)
  • ¼ cup tomato paste
  • 2 ½ cups tomato juice (I prefer V-8)

Directions:

  • Discard a couple of the outer leaves from the cabbage head, since they are usually damaged, thus not usable.
  • Trim off the top of the core like this:

how-to-core-cabbage-1

  • Haul out the core, to look like this:

how-to-core-cabbage-21

  • Fill a large pot 2/3 full with water.
  • Add 1 Tbs. of salt, and bring to boil.
  • Place the cabbage in the water, with the hauled out end down, and boil it for about 5 minutes.
  • Turn the cabbage head over, so the cored out end is up, and boil for about 3 minutes. Using a long handle fork, such as grilling fork, start separating the leaves from the cabbage, keeping them around the cabbage head, and continue boiling for 2 minutes longer, or until somewhat transparent looking:

loosening-leaves-from-cabbage-head

stacking-up-parboiled-cabbage-leaves

parboiling-cabbage-leaves1

  • Using the same long fork, start removing parboiled leaves onto a platter.
  • Once all the large and medium size leaves are all parboiled and removed, let them cool off.
  • Trim off the coarse veins from the stem of each leaf, like this:

pare-off-coarse-veins-2

Prepare filling.

  1. In saucepan, heat oil over medium heat.
  2. Cook onions, garlic, oregano, thyme, and caraway seeds for 5 minutes, or until softened.
  3. Stir in rice.
  4. Add vegetable stock, bring to boil, reduce heat, cover, and simmer for 20 minutes or until tender.
  5. Stir in carrots, zucchini, salt and pepper.
  6. Let cool
  7. Fill the cabbage leaves to form rolls.
  8. Cup you hand, place a cabbage leaf in your cupped palm, with the outer section of the leaf towards your fingers, spoon 1/3 cup of filling onto the bottom of each leaf, like this:

place-filling-inside-the-leaf1

  • Fold up the bottom and sides of the leaf over the filling, then roll up, forming a roll like this:

folding-the-leaf-to-make-a-roll2

  • Line a 9×13 baking dish with half of the sauerkraut (optional – see tip below).
  • Arrange cabbage rolls on top, side by side, to form a layer.
  • Cover with remaining sauerkraut (optional – see tip below).
  • Whisk tomato paste into tomato juice, and pour over the rolls.
  • Cover securely with foil.
  • Bake in 350 degrees F, for 2 hours, or until tender.

Tip: You may exclude the sauerkraut, if you are not a big fan of this vegetable, or if you do not wish to experience a more piquant flavor of this dish. In that case, line the bottom of the pan with chopped up left over cooked cabbage leaves. If you do not have any leaves left to cover the top, then the tomato sauce will be sufficient.

Someone mentioned to me that instead of cooking the cabbage leaves, they freeze the whole head of cored out cabbage, then thaw it when ready to make cabbage rolls. I have yet to test this one out.

Angel Wings (Khrusty)- Recipe

angel-wings-khrusty1Angel Wings, known as, Khrusty, or Chrusciki, are a very popular and dainty dessert specialty found in Polish bakeries, European specialty stores, and even some grocery stores. They are very light and airy, and quite simple to make.  My granddaughter already loves these, so I make sure these are on hand when she is visiting.  This recipe makes 24-30 pieces.

Ingredients:

  • 4 egg yolks
  • 1 Tbs. white vinegar
  • 1 Tbs. sour cream
  • 1 Tbs. sugar
  • 1 cup flour
  • 1/8 tsp. salt
  • 1 tsp. vanilla extract
  • Canola oil for frying
  • Powdered sugar

Directions:

  1. Mix all ingredients together to form dough smooth enough to roll out.
  2. Place your dough on a floured board, or counter top.
  3. Use a rolling pin and roll out the dough very thin, 1/8 inch thick or slightly thinner.
  4. Use pizza cutter, and cut 1 inch wide slices, then cut these into 3 inches long pieces.
  5. Make a lengthwise slid in the middle of each of the 1 x 3 inch pieces, leaving at least ¼ inch from each end.
  6. Pull one end through the slid, to form a twist.
  7. Fill a frying pan with canola oil, about 2 inches deep.
  8. Heat the oil to about 200 degrees (to test the oil, drop in one piece of dough, and if it starts to sizzle, the oil is ready).
  9. Place your angel wings in the hot oil, as many as you can fit without crowding them.
  10. Fry for one minute on one side.
  11. Turn them over (I use a fork), and fry on the other side for another minute.
  12. Using tongs, remove golden fried angel wings onto a platter lined with paper towel, to absorb any excess oil.
  13. Cool them completely.
  14. Sprinkle generously with powdered sugar on both sides.

angel-wings-in-a-frying-pan-khrusty1

angel-wings-khrusty21

angel-wings-khrusty-drying-off-on-paper-towel2

Angel Wings are an excellent accompaniment to a nice cup of your favorite tea.

Tip: I use 1 tsp. of vinegar and 1 tsp. of Rectified Spirit (95% alcohol).  The
alcohol evaporates during frying, but makes the dough very ligh
t.

Suburbs or Cities – Love Them Or Leave Them

Recently I read an article, Suburbia R.I.P, written by Michael Cannell, leaving me with a feeling that living in the suburbs is a dying dream….” In the wake of the foreclosure crisis many new subdivisions are left half built and more established suburbs face abandonment”.  There might be some truth to his statement, since the downturn of our economy affects everyone, including the suburbs.  The new home construction did slow down considerably, but I have yet to see “half built” abandoned subdivisions, or totally abandoned suburbs.

Suburbia took on a different look these days, in comparison to what it was like 50 or more years ago.  The square footage of new homes is ever increasing, so is the demand for large lots, multi-car garages, private outdoor heated pools, tennis courts, central air conditioning, etc.  Many homes in the suburbs are built now in clusters, gated communities, or developments, run by associations, giving them a very neat and uniform appearance.  These developments are usually located within 5-10 miles from shopping centers, restaurants, hospitals, and other commercial centers, not exactly located somewhere in deserted areas, away from civilization.

Michael also states that homes constructed today do not measure up, quality wise, to homes built year ago…”the 1930s homes held up because they were made with solid materials, and today’s spec homes are all hollow doors, plastic columns and faux stone facades”, here again I only partially agree with his analysis.  Consumers have several choices today in constructing a home they can afford, thus some choose modular (precision-built) homes, which cosmetically look very nice, but does lack the quality of the traditional home.  But then again, one still can have a newly constructed traditional home which supersedes the 1930’s homes, because the new homes are star energy efficient, include environmentally safer materials (such as no asbestos or led paint), are well insulated, have double or triple pane windows, thus saving on energy usage, and still may include hard wood floors, ceramic tile, granite countertops, hot tubs, brick or stone exterior, etc.

Of course one expects to have a higher energy bill living in the suburbs in a 3200+ sq.ft. home, in comparison to 450+ sq. ft. flat in the city…. luxury costs money.  However at the same time, the purchase price of the same flat in the city could cost you as much as the home in the suburbs, so it’s all relevant.  Also, rent in the city could equal the mortgage payment of the suburbs’ home.  In the suburbs every licensed member of the family usually owns a car, but in the city majority of the population depends on public transportation, due to high maintenance cost of owning a car (limited space, high insurance rates  and parking fees).

I personally experienced life in the city and the suburbs, and I still prefer the suburbs to live in  and raise a family.  I love to visit cities, since there is so much to see and enjoy, but the suburb’s fresh air, the abundance of nature, the tranquility, the close knit neighborhoods, are my favorite attractions of these areas.  The privacy and luxury of having y0ur own yard to play with your children or grandchildren. To be able to have a flower patch or a garden, to cultivate your own organic fruits and vegetables, relax on the patio and watch the sunrise and sunset.  Wake up to the sound of singing birds, rather than a siren of a fire truck, or a police car.  I also love the beauty of the seasonal changes of nature, especially during spring and fall, which is so much more noticeable  in the suburbs.

I strongly believe that the suburbs will survive the current economic downfall and continue to flourish and attract the urban population to move into them.

I would love to hear your stories and opinions on this subject, whether you live in a city or suburb.  What is your opinion on Michael’s theory.

Green Punch – St. Patrick’s Day

green-punch
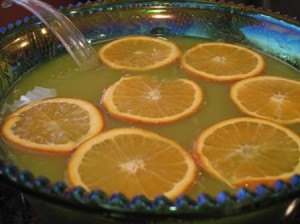
With lots of green for St. Patrick’s Day, I am contributing with a Green Punch recipe (non-alcoholic), for those who are too young, or not so fond of alcohol, to be indulging in Guinness, or other green beer.  This is a quite refreshing punch, suitable for any occasion.

Ingredients:

  • 2 packages of lime flavored gelatin mix (3oz each)
  • 1 quart of hot water
  • 1 can of pineapple juice (46oz)
  • 2 cans of frozen orange juice concentrate, thawed (12oz each)
  • 1 cup of sugar (optional – see tip below)
  • 4 ½ cups of cold water
  • 2 liters of Ginger Ale

Directions:

  1. Pour 1 quart of hot water into a large saucepan, and dissolve the gelatin.
  2. Allow to cool.
  3. Pour the cooled gelatin into a large punch bowl.
  4. Stir in:  pineapple juice, orange juice concentrate, sugar, and 4 ½ cups of cold water.
  5. Just before serving, pour in the Ginger Ale.

Happy St. Patrick’s Day!!!!!


Tip: I skip the sugar, because to me the punch is sweet enough without it.


80 Years Old Ukrainian Easter Eggs (Pysanky)

bart-family-ukrainian-easter-eggs2These Ukrainian Easter Eggs (Pysanky) were decorated by my Great-Aunt and her children, in Queens, New York, over 80 years ago.  The “sticks” displayed in front of the platter, are home made styluses (kistkas), used for outlining, with wax, the design on these eggs.  These styluses’ handles were made from tree twigs, and the metal funnels were made from a metal can cut outs, or straight pins pushed through the tips of the handles…..such was life 70 years ago.

Her love of art and tradition, was passed down to yet another generation, and another, and another, and still going…….Some of the dyes they used for coloring these eggs, where purchased in powder form, but other ones were created at home, by cooking red beets, onion skins, tree bark, etc.

I commend her children for preserving these Easter Eggs for all these years, and I am honored to be the recipient of this family heirloom.  I promised to continue to preserve these, and  to share the story about the beginning of our family roots in the US since early 1900’s.

bart-home-made-kistkas-and-current-ones1Here I have displayed the 80 years old home made styluses, in comparison to the two manufactured ones, used currently by most egg designers.  Professional egg designers  prefer to use the electric styluses with various size tips, ranging from very fine tips, used for the very fine lines of the design, to very large size tips, used for a large area to be filled with melted wax.

If you are interested in purchasing Egg Design books, or some very unique Easter Eggs, you can find them here.

Here you will be able to find Ukrainian Easter Egg decorating kits and other supplies.


The Twelve Steps In Decorating Pysanky

twelve-steps-in-decorating-ukrainian-easter-eggs-2

If you decided to decorate your own Ukrainian Easter Egg (Pysanka), you will need the following supplies:

  • White eggs – raw, free of any imperfections, at room temperature
  • White vinegar
  • Pencil – #2
  • 4 containers to hold the dye
  • 4 teaspoons (to lower and remove the eggs from the dye)
  • 1 set of food coloring (yellow, red, blue, green)
  • Q-tips
  • Needle
  • Egg drying board
  • Oil based polyurethane
  • Candle, and lighter or matches
  • Paper towels
  • Egg Decorating book or design samples
  • Ukrainian Easter Egg decorating kit, or
  • 1 fine point stylus (kistka)
  • 1 large point stylus
  • 1 cake of beeswax
  • 4 dyes – yellow, orange, red, black

The whole process of decorating a pysanka, consists of twelve basic steps (the above display shows all the major steps from left to right, with the exclusion of the totally black egg, once it comes out of the black dye).  I have chosen a very basic egg design for the first egg, and if you purchased an egg decorating kit, you will find several other designs to choose from for your next projects.

Step 1 – Prepare your dyes per package directions.  Cover your work area with newspapers, or paper towels. Have  your candle and lighter ready when needed.  Clean your egg by wiping it gently with soft cloth dipped in 1 cup of water mixed with 1 Tbs. of white vinegar.  Let the egg dry off.

Step 2 - Using the #2 pencil, draw, lightly, the main lines of your design on the clean egg (you do not need to use pencil to draw your design, if you feel comfortable enough to use the wax from the start).   Now go over your penciled lines with the stylus (kistka) filled with warm, liquefied beeswax.  Be careful as not to drip any wax on you egg (since the color will not dye the shell in that spot.  If you do have a drip, you need to scrape it off real well, using a needle tip).  To get wax into your stylus, you scrape it against the cake of wax, so the funnel fills up with wax, then you hold it over the candle flame, with the stylus tip poitning down, and as soon as the wax starts to melt, you start drawing with it on your egg.  You need to keep on heating up your stylus to keep the was flawing.

Step 3 – Dip your egg in Yellow dye for at least 10 minutes. Make sure your dyes are cold before placing your egg in.  Use a teaspoon to remove your egg gently onto paper towel, and pat it dry.  Let it dry for a few minutes.  Follow these steps after each dye.

Step 4 – Using the #2 pencil again, draw the lines which will be yellow in your design, then go over them with wax as above.  With the use of a toothpick or Q-tip, dipped in Green food color, fill the inside sections of the star.

Step 5 – Dip your yellow egg in Orange dye, and keep it there for at least 10 minutes.

Step 6 – Draw all the lines which you want to have orange, and go over them with hot wax, as in step 2.  Also, fill in with wax, any areas which you want to have orange.

Step 7 – Dip the orange egg in Red dye, and keep it in for at least 10 minutes.

Step 8 – Draw all the lines you want to be red, and go over them with hot was, as in step 2.  Also, fill in with wax, any areas which you want to have red.

Step 9 – Dip the red egg in Black dye, and keep it in for at least 15 minutes or longer.

Step 10 – Remove the egg from black dye, pat it dry with paper towel, and expose the waxed egg to the heat of the candle flame (side not top of the flame) to melt off the wax, a small area at a time, and wipe away gently, repeating the process until all the wax has melted, and has been wiped off.

Step 11 – You can leave your egg as is, or for shiny finish and to preserve the vibrant color, cover the egg with oil based polyurethane (use disposable gloves) and leave it overnight to dry off on the egg dryer board.  Your can make this board by drawing thin nails all the way through into a piece of thin plywood, so that they stick out at least an inch on the other side, and are spaced out enough so an egg can rest on at least three nail tips, for support.  These eggs will need to dry for a couple of days or longer.

Step 12 – Make a small hole at the tip of the egg (you can use a very thin drill), and expel the egg fluids out of it, stand it on the egg dryer rack once more, with the hole down, so that any leftover fluids can drip out.  Once you have successfully completed all the steps, your plain white egg magically transformed into a beautiful Pysanka.  Now you are ready to start another one…..believe me you will not stop after just one…..you will be hooked on this craft.

easter-egg-decorating-step-7

easter-eggs-decorated-by-my-children2Once the winter season is nearing its end, the days become longer, the sun feels warmer, and the earth wakes up and shows signs of new life, we also feel refreshed and ready to celebrate spring.  Some of the more popular spring celebrations in the United States include the visit by the Easter Bunny, Easter Egg Decorating, and Easter Egg Hunt.

Our family celebrates spring with preparations for Easter Sunday Holiday and decorating of Easter Eggs.  There are many ways to decorate eggs, such us coloring them with edible dyes in all different pastel colors, placing colorful stickers, beads, ribbons, etc. on eggs, drawing designs with markers, etc.  There is also a very intricate egg decorating style, which I will introduce you to, and that is the Ukrainian Easter Egg, Pysanka, design.

My parents were my first mentors, and story tellers, about this old tradition, which was very popular in their native countries, Ukraine and Poland, and it continues to thrive in the Diaspora.

Egg decorating tradition dates back to pagan times, well over 2000 years before the time of Christ.  People believed that great power was embodied in the egg, so they decorated eggs in the spring to celebrate the warmth of the sun which in turn brought back the joy and vigor to life, after the cold winter months.  Decorated eggs were used by well wishers for good luck, prosperity, and even fertility.  Single girls would make sure to have a nice collections of freshly decorated Easter Eggs to present to every young man who would visit their home during Easter time.  Also, on Easter Monday (still being an Easter Holiday in Ukraine and Poland) if girls ran out or Easter Eggs to give away as gifts, their male friends would bring them outside, and drench them with buckets of water.  This custom has died out somewhat, but children, especially boys, still have fun spraying the girls with water held in specially designed color plastic eggs with  a sprayer top.  There also was an old legend that if you are lucky enough to preserve an Easter Egg for 100 years, the insides will dry out and turn into a diamond.  The 80 year old Easter Eggs I have in my collections, will definitely not prove this legend right or wrong, since these eggs are hollowed out, actually to my advantage (believe me, you don’t want one of these old whole eggs crack open on you….).

With the introduction of Christianity, the ancient customs were absorbed into the Christian celebration of Christ’s Resurrection.  The new meanings expressed in the design, blended harmoniously with the old, so today the decorated eggs display a mixture of the pagan and the Christian symbolism in their design.

Ukrainian Easter Egg decorating is very intricate, since it requires the use of hot liquefied beeswax, flowing through a stylus, kistka, a metal funnel like vessel attached to a wooden, pencil like, handle, with which the artist is outlining a design on the shell of a raw white egg.  The color usage sequence is extremely important in Ukrainian Easter Egg decorating, to capture the most vibrant colors in the design of the final product, so it requires very thoughtful planning of the design as the first step, before starting to decorate the egg.

There are four basic colors used in Ukrainian Easter Egg decorating:  yellow, orange, red, and black.  Of course, there are numerous other colors incorporated in small amounts into the design, and some styles require other major colors, but the main four colors are almost always found in all designs.  What makes the Ukrainian Easter Eggs different from other designs, is the geometric pattern used in majority of the designs.

The design elements also have a symbolic meaning, pagan and Christian, and here are some examples:

  • Flowers – symbol of love, charity, good will
  • Wheat – symbol of good health, and wishes for bountiful harvest
  • Storks, chicks, hens, roosters – symbol of fertility
  • Triangles – symbol of trinity (air, fire, water; heaven, earth, hell; father, mother, child; sun, thunder, bonfire; Father, Son, Holy Spirit)
  • Net – symbol of “fishers of men”, used in Christianity
  • Pine needles – symbol of long life, youth, and health
  • Sun and stars – symbol of life itself, growth, good fortune
  • Various forms of ribbons – symbol of never ending line representing everlasting life

Now that I have introduced you to the egg decorating tradition, and a brief description of the Ukrainian Easter Egg decorating style, my next post will describe this process step by step, so stay tuned until then.

March – Humor of the Month

Top Ten Things Only Women Understand

10. Cats’ facial expressions.

9. The need for the same style of shoes in different colours.

8. Why bean sprouts aren’t just weeds.

7. Fat clothes.

6. Taking a car trip without trying to beat your best time.

5. The difference between beige, ecru, cream, off-white, and eggshell.

4. Cutting your hair to make it grow.

3. Eyelash curlers.

2. The inaccuracy of every bathroom scale ever made.

AND, the Number One thing only women understand:

1. OTHER WOMEN

« Previous Entries  Next Page »