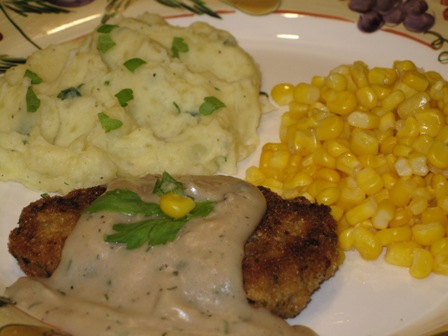
Simple advice for a better life.

Chicken/Turkey Cutlets – Recipe

chicken-cutletThis Chicken Cutlet recipe is a creative way of making a new meal out of left over chicken,  or turkey meat.

When I roast a whole chicken for the two of us, I end up with three meals out of that one bird.  First night we have the roasted meat, next day I make chicken salad, or chicken pot pie out of half of the left over meat.  On the third day I am still able to make these chicken cutlets, which I usually end up freezing, because who wants to eat chicken for three days straight.  I use the leftover bones (with some remnants of meat on them), plus the leftover juices in the roasting pan, and some vegetables, to prepare a great soup stock.  You can freeze it for later use, or make it into a tomato, or vegetable soup.

This recipe makes 4-6 medium size cutlets.

Ingredients:

  • 2 cups chicken meat, or leftover turkey, cooked and cut up
  • 1 medium onion, chopped and sautéed
  • 1 clove garlic, minced
  • 1 carrot, shredded
  • 2 stalks celery, chopped
  • 4Tbs. canola oil
  • 2 Tbs. of flour
  • ¼ cup of water, or chicken broth
  • 1 egg
  • 1 Tbs. fresh parsley, chopped
  • Salt and pepper to taste
  • 1 cup Italian seasoned bread crumbs
  • Canola oil for frying

Directions:

  1. Heat 2 Tbs. of canola oil in a saucepan.
  2. Add chopped onions, shredded carrot, and chopped celery.
  3. Sauté for 5 minutes.
  4. Add minced garlic and sauté one more minute.
  5. Remove vegetables from the pan and add to chopped up chicken.
  6. Add 2 Tbs. canola oil to the sauce pan, heat again.
  7. Add 2 Tbs. flour, and sauté, stirring constantly, until slightly golden.
  8. Add ¼ cup of water, bring to boil, and continue to mix.
  9. Add to chicken mixture.
  10. Add chopped parsley, egg, salt and pepper to taste.
  11. Mix well.
  12. Form oblong cutlets.
  13. Dip both sides in seasoned bread crumbs.
  14. Let rest for a few minutes, until the oil is ready for frying.
  15. Fry lightly 5 minutes per side.

Tip: I serve these cutlets with garlic and parsley mashed potatoes, home made gravy, and a fresh vegetable.

Great way to use up that leftover turkey meat from your Thanksgiving feast!!!!

Giving Thanks – Thanksgiving

DSCN3502

Thanksgiving is fast approaching, family and friends are finalizing their travel arrangements, turkey is defrosting, Black Friday is inevitable, and most of all,

TIME TO GIVE THANKS:

I AM THANKFUL:

FOR THE HUSBAND
WHO IS ON THE SOFA
BEING A COUCH POTATO,

BECAUSE HE IS HOME WITH ME
AND NOT OUT AT THE BARS.

FOR THE WIFE
WHO SAYS IT’S HOT DOGS TONIGHT,

BECAUSE SHE IS HOME WITH ME,
AND NOT OUT WITH SOMEONE ELSE

FOR THE TEENAGER
WHO IS COMPLAINING ABOUT DOING DISHES

BECAUSE IT MEANS SHE IS AT HOME,
NOT ON THE STREETS.

FOR THE TAXES I PAY
BECAUSE IT MEANS
I AM EMPLOYED.

FOR THE MESS TO CLEAN AFTER A PARTY
BECAUSE IT MEANS I HAVE
BEEN SURROUNDED BY FRIENDS

FOR THE CLOTHES THAT FIT A LITTLE TOO SNUG
BECAUSE IT MEANS
I HAVE ENOUGH TO EAT.

FOR MY SHADOW THAT WATCHES ME WORK
BECAUSE IT MEANS
I AM OUT IN THE SUNSHINE

FOR A LAWN THAT NEEDS MOWING,
WINDOWS THAT NEED CLEANING,
AND GUTTERS THAT NEED FIXING

BECAUSE IT MEANS I HAVE A HOME.

FOR ALL THE COMPLAINING
I HEAR ABOUT THE GOVERNMENT

BECAUSE IT MEANS
WE HAVE FREEDOM OF SPEECH.

FOR THE PARKING SPOT
I FIND AT THE FAR END OF THE PARKING LOT

BECAUSE IT MEANS I AM CAPABLE OF WALKING
AND I HAVE BEEN BLESSED WITH TRA NSPORTATION.

FOR MY HUGE HEATING BILL
BECAUSE IT MEANS
I AM WARM.

FOR THE LADY BEHIND ME IN CHURCH WHO SINGS OFF KEY
BECAUSE IT MEANS
I CAN HEAR.

FOR THE PILE OF LAUNDRY AND IRONING
BECAUSE IT MEANS
I HAVE CLOTHES TO WEAR

FOR WEARINESS AND ACHING MUSCLES
AT THE END OF THE DAY

BECAUSE IT MEANS I HAVE BEEN
CAPABLE OF WORKING HARD.

FOR THE ALARM THAT GOES OFF
IN THE EARLY MORNING HOURS

BECAUSE IT MEANS I AM ALIVE.

HAPPY THANKSGIVING TO ALL!!!!!

Asian–Style Turkey Burgers – Recipe

Asian-Style Turkey BurgerThanksgiving is almost here.  You love turkey, but this year you want to keep it low key, so I have just the right recipe for you….ASIAN-STYLE TURKEY BURGERS!!!!

I am not very fond of turkey myself, but I do prepare a big Thanksgiving Feast for my family.

These Asian-Style Turkey Burgers are great, if you are opting out of cooking up a storm for Thanksgiving!  They are easy to prepare, moist and flavorful, and only about 280 calories per serving.   How can you beat that!  I serve then on a 100 calorie Multi-Grain Sandwich Thins, made by Arnold.  You can add some of your favorite trimmings, and celebrate Thanksgiving on a lite side.

Ingredients:

  • 1 lb ground turkey
  • 1/3 cup onions, chopped fine
  • 3 Tbs fresh Italian Parsley, chopped
  • 2 Tbs Worcestershire sauce
  • 2 Tbs Green Pepper, minced
  • 1 Tbs Low Sodium Soy Sauce
  • 1 Tbs cold water
  • 2 tsp fresh Ginger, peeled and grated (or 1 tsp powdered)
  • ½ tsp salt
  • ½ tsp pepper
  • 3 cloves garlic, minced
  • 2 Tbs oil for frying
  • 4 Multi-Grain Sandwich Thins, 100 calorie each

Directions:

  1. In a large bowl, mix well the first 11 ingredients.
  2. Divide the turkey mixture to 4 equal portions, shaping each into a ¾ inch-thick patty.
  3. Coat a large skillet with oil, warm over medium high heat, until hot.
  4. Add patties, and cook for 8 minutes on each side, or until done.
  5. Serve on buns, with your favorite condiments and trimmings.

Tip:  Just for fun, I checked on the calories in some fast food chicken sandwiches, as I have not noticed turkey on their menu yet, and found out that these range from 360 – 660 calories per sandwich…ouch!

Herzkartoffel

Creative Commons License photo credit: Last Hero

Here is a very simple question, regarding not such an easy task:

Do you like peeling potatoes?

Peeling potatoes doesn’t look difficult, especially when someone else is doing it, right?

I was always quite amazed by the speed my mom would peel potatoes, but no matter how hard I try; I don’t even get close to her speed.  I personally do not like peeling potatoes, and one of the reasons is that I feel very awkward using the potato peeler, so I use a paring knife, with a constant fear of cutting myself.   I use potatoes a lot in my cooking, so it is a must job for me!

However, as with any other problem, someone always comes up with a great solution.  My potato peeling dilemma has been eased by this simple “Never again peel potatoes” method.

Please watch this wonderful video, sent to me by a friend, and let me know what you think.

First time I watched this video, I had some doubts, but believe me, I tried it and it REALLY WORKS!!!!!!

I had Red Potatoes on hand, so I used those to test this theory.  Once the potatoes cooked, I drained out the hot water, filled a bowl with cold water from my faucet (I did not even use ice water), and placed the hot potatoe in it.  After 30 seconds, the potato skin came off like magic.

What a great time saver, especially if you are planning to make a potato salad.

Now, how easy and convenient is that??

Please give it a try, and let me know what you think.

Are you ready to throw away your potato peeler yet?

I am still keeping mine, since I love to use it for peeling carrots and cucumbers.

If you have additional “easy does it” suggestions for solving any other tedious tasks, please share them with me and all my readers, since I enjoy testing these out, and passing them on to others.

Homemade Varenyky/Pierogi – Recipe & Technique

VarenykyOne of the most popular dishes in Eastern European cooking is Filled Dumplings, known as: Varenyky or Pyrohy in Ukrainian, and Pierogi in Polish.  They are made from homemade pasta dough and filled with varieties of fillings, but potato and cheese filling being the most popular.

It is definitely “labor of love” for those who make them from scratch, as it requires several hours of preparation time, but it is so well worth it.  The store bought “Pierogies” just do not measure up to the homemade version!!!  I was so proud of my daughter when she made these for the first time, without asking me for assistance.

These dumplings were made for generations, but if you ask your mom of grandma for a recipe, you get a very vague list of ingredients, and even less detailed preparation instructions.  The first time I made Varenyky, I also played by ear with measuring the ingredients, but with some luck, they turned out quite well.

Currently, thanks to Internet, you can find any recipe you can think of, but I will share my own ingredients, directions and pictures, so if you have the will power, you can give it a try, and enjoy homemade Varenyky/Pierogi made by YOU.  The filling needs to be prepared ahead of time, before the dough, so it has time to cool down.

Ingredients for dough:

  • 4 cups flour (all purpose – King Arthur or Pillsbury)
  • 1 tsp. Salt
  • 1 egg (slightly beaten)
  • 1 cup whole milk
  • ½ cup sour cream

Directions:

  1. Measure 4 cups of flour and place it on your counter top in a mound, making a well in the middle.
  2. Add the egg, salt and sour cream into the well.

Flour mound with a well

  1. Using a spoon, start incorporating the flour from the inside of the well, into the wet ingredients, forming soft dough.
  2. Keep on adding the milk slowly into the mixture in the well, until all used up.
  3. Continue to mix in the remaining flour until soft dough is formed.  You might have some left over flour, depending on how dry the flour is that day.  You might have to leave some of the flour, or add some more milk to the dough.

Step 2 - working in the flour

  1. Knead the dough for about 5 minutes, adding a little bit of flour so it does not stick to the countertop, but not too much so the dough does not become to dense.  It should feel like fresh pizza dough, or slightly softer.
  2. Place your dough on a floured part of a countertop, cover with a tea towel, and let it rest for 15 minute

Step 3 - completed dough, ready to rest

  1. Clean you work area of the countertop, sprinkle generously with flour, cut the dough in half, place one half on the floured work area, leave the rest covered for later use.
  2. Flatten the dough, and using a rolling pin, keep on rolling it up and down and side to side, until it is uniformly thin to about 1/8 inch.

Rolling out the dough

  1. Using a donuts cutter, or a rim of a glass, cut out circles from the rolled out dough, until all is used up.

Step 4 - cutting out circles

  1. Place the circles on a floured tea towel, and cover with another towel to keep them from drying out.

Step 5 - dough circles placed on a floured kitchen towels

  1. Form a new dough ball from the remaining dough left from the cut outs, and repeat the above rolling/cutting out process.
  2. Once the dough starts to get too thick, do not use it for Varenyky, but you may make it into pasta or just discard it.
  3. Repeat the process with the second half of the dough, which was resting during this time, until all used up.
  4. Now you are ready to fill your dumplings with your favorite filling, which needed to be prepared ahead of time, so it had a chance to cool off.
  5. Place a heaping teaspoon of filling in the middle of a dough circle.

Step 6 - ready to wrap the  filling

  1. Fold in half, and pinch sides together well enough so they do not open up.  If you do not seal them well, the filling will boil out during cooking time.

Step 7 - fold the dough circle in half around the filling Step 9 - completed raw productStep 8 - Pinch the sides together from one end to the other

  1. Repeat the filling/pinching process until all circles are filled.

Step 10 - completed varenyky ready to coook

  1. Keep the finished product covered with a tea towel, until ready to cook.
  2. Fill a large pot with salted water and bring to boil.
  3. Drop slowly 8-12 Varenyky into the boiling water; keep close to the surface of the water to avoid splashing hot water on you.
  4. Stir gently, with a wooden spoon, to prevent Varenyky from sticking to the bottom of the pot.
  5. The Varenyky will float to the top of the water.  Do not cover the pot.
  6. Bring back to boiling point, and boil for 2 minutes.
  7. Remove with a slotted spoon onto a strainer placed over a bowl.
  8. Bring it over the kitchen sink, fill the bowl with cold water and place the Varenyky in it for a couple of minutes, then pour out into the strainer again to let the water drain off.  Then pour them out onto a large plate to cool off.
  9. By this time your water is boiling again, so repeat the cooking process until all Varenyky are cooked.

Potato filled Varenyky are best served warm, with onions sautéed in lots of butter, accompanied by a dollop of sour cream. YUMMY!!!!!

They also freeze very well. You need to make sure they are cold and tossed with some oil, to prevent sticking, before freezing them. I use a zip lock bag, and freeze one dozen at a time.

Potato/cheese Filling:

  • 8 medium potatoes (Yukon Gold, Red, or Idaho)
  • 1/4 lb Yellow American Cheese
  • ¼ lb White American Cheese
  • ¼ cup sour cream
  • 1 large onion, chopped and sautéed in ¼ cup butter
  • Salt and pepper to taste

Directions:

  1. Peel and quarter potatoes.
  2. Fill a medium size pot with water, add potatoes and bring to boil.
  3. Cook until done.
  4. Sauté onions in butter, until golden.
  5. Drain water from cooked potatoes.
  6. Add sautéed onions, sour cream, cheeses, salt and pepper.
  7. Mash well.
  8. Cool before using.

Red Beets – Health Benefits

Red Beets from my gardenIf you have been following my posts, you already know that one of my hobbies is gardening.

The growing season is over, but my organic garden is still supplying me with some of the herbs and vegetables.

One of these vegetables still in supply, is a red beet.  Not everyone likes red beets, but my family and I happen to like red beets, and I either cook borscht from beets, or make vinaigrette salads.  Actually red beet borscht is one of the main meatless courses at a Traditional Ukrainian Christmas Eve dinner.

I will post my red beet recipes in future posts, but this time I would like to tell you a little bit about the health benefits of this vegetable.  You may not have been very fond of red beets before, but you might reconsider, once you are aware of its health benefits.

  • Red beets are high in carbohydrates and low in fat and it is an excellent source of folic acid
  • It is loaded with antioxidant that helps the body against heart disease, certain cancer especially colon cancer
  • It is believed that red beets, when eaten regularly, may help against certain oxidative stress-related disorders
  • The fiber in red beets helps to reduce serum cholesterol by 30-40%, and help in normalizing blood pressure
  • The iron content in red beets is of a very fine quality and it makes a powerful cleanser and builder of blood
  • It contains folic acid, thus recommended to be consumed by pregnant women, to lower the risk of spina befida and other neural tube defects in newborns
  • Red beet juice stimulates the function of liver cells and protects the liver and bile ducts
  • A mixture of red beet juice and carrot juice is an excellent aid in healing gout, kidney, and gall bladder problems

Even though most of the health benefits from consuming red beets is from the root of the plant, the leaves and stems should also be consumed, since these contain such nutrients as: beta-carotene, folic acid, chlorophyll, potassium, iron and vitamin C.

So, if you were not so fond of red beets before, are you ready to give it a try now?

You have nothing to lose, and lots of healthful stuff to gain.

Heart Attack – Follow Up

Chinese Anatomy Body Person 2

Creative Commons License photo credit: upton

My previous post on Heart Attack- Self Help, provided some helpful information on what symptoms to watch for, if you think that you, or someone else, might be experiencing a heart attack.

One of my readers, “Busy Mom” , left a very informative comment, which I felt I should share with those of you who read the posts, but not necessarily the comments.

Here is what she wrote:

Great article.  Ladies, please keep in mind that a heart attack in a woman is much less “classic” than in a man, which makes it a bigger problem (less women seek early medical attention and therefore have poorer outcomes).  A lot of women will NOT experience chest pain or pressure during a heart attack which is why it is so important to seek help if you have any of the more subtle symptoms like jaw or back pain.

As far as the aspirin goes, you should CHEW, not just swallow, one full strength (325 mg) or FOUR low dose (81 mg) aspirins.  This will get the aspirin into your system quickly, so it can start to thin your blood to lessen the damage to your heart muscle.   Keep an in-date bottle in your home in a non-humid and stable temperature location (i.e. not the bathroom).

Heart Attack – Self Help

Chinese Anatomy Body Person 2

Creative Commons License photo credit: upton

Many people live alone these days, so when a heart attack strikes, they need to act quickly and apply this very simple self-help, to buy time before  their medical help arrives, or to get to a hospital.

Even though most people associate mainly chest pain with a possible heart attack, here is a list of the most common symptoms of heart attack found in most men and women:

  • Chest discomfort, uncomfortable pressure over the chest
  • fullness of chest
  • squeezing of chest
  • pain in the center of the chest
  • spreading pain to inner side of left arm(occasionally right arm)
  • Pain over the upper back
  • Radiating pain to the jaw
  • Radiating pain over the neck region
  • Upper part the stomach(epigastric region)-In this condition usually women are mis diagnosed as they are suffering from gastritis and treated with antacids
  • Nausea or vomiting
  • Sweating
  • Chest pain(30% only)

When a person suspects an oncoming heart attack, which might have different symptoms for men than for women, they need to cough repeatedly and very vigorously.   I have read in various articles that men might feel an oncoming heart attack by experiencing tightness in the chest, shortness of breath, and chest pain.  Women, on the other hand, may have totally different symptoms, such as pain between their shoulder blades, as well as pain in the lower jaw, radiating down their neck.

Take an aspirin as fast as you can, and call 911 immediately!!!

Without help, the person whose heart is beating improperly, and who begins to feel faint, has only about 10 seconds left before losing consciousness.

A deep breath should be taken before each cough, and the cough must be deep and prolonged, as when producing sputum from deep inside the chest.

A breath and a cough must be repeated about every two seconds without let up until help arrives, or until the heart is felt to be beating normally again.

By taking deep breaths, it helps the oxygen get into the lungs, and coughing movements squeeze the heart and keep the blood circulating, and help to regain normal rhythm.

Hopefully none of us will ever have to test this theory, but please keep it in mind and pass it on to your family and friends, since it might help someone to stay alive.                                                      


Truth and Consequences – Words of Wisdom

If you tell the truth,


you don’t have to remember anything.


Time is precious,


but truth is more precious than time.