Homemade Varenyky/Perogy – Recipe & Technique
 One of the most popular dishes in Eastern European cuisine is Filled Dumplings, known as Varenyky, also frequently referred to as Perohy by many, or Pierogi in Polish. They are made with homemade pasta dough and filled with a variety of fillings, but potato with cheese is the most popular filling of all.
It is definitely a “labor of love” for those who make them from scratch, as it requires several hours of preparation time, but it is so worth it.
The commercially mass-produced “Pierogies” just do not measure up to the homemade version!
I was so proud of my daughter when she made these for the first time without asking for assistance….:-)
Varenyky dumplings were prepared by many cooks for generations. However, if you ask your mom or grandma for a recipe, you get a very vague list of ingredients (a little bit of this and a little bit of that), with even less detailed preparation instructions.
Today I will share my list of ingredients, step-by-step instructions, and pictures, so you can give it a try and enjoy your homemade varenyky/perohy/pierogi. The filling needs to be prepared ahead of time so it is cool before use.
Potato-filled Varenyky are best served warm with caramelized onions sautéed in lots of butter, accompanied by a dollop of sour cream.
If you like your dumplings crispy, you can gently fry them on both sides to a golden color and crispness, using a hot pan generously greased with butter. YUMMY!!!!!
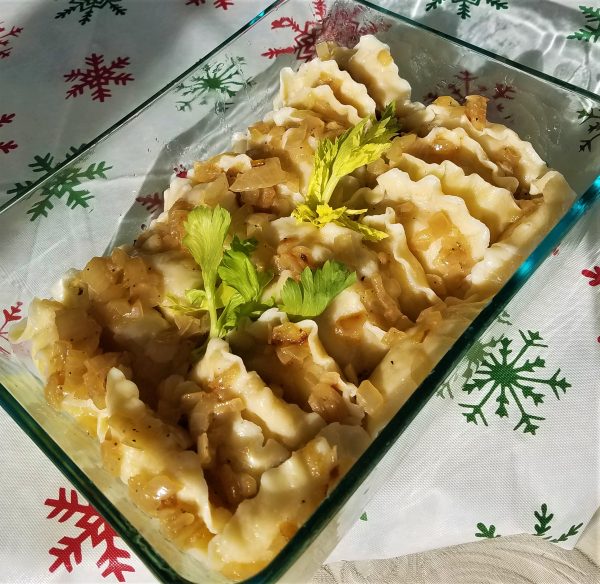
This is how I serve my varenyky, whether they are fresh or need to be reheated before serving. They never stick together since they are stacked side by side with the round edge downward and the pinched sides upward. I smother their tops with lots of butter and sautéed onions.
To reheat them in a large quantity, I add 1/4 to 1/2 cup of water into the pan (this creates steam during the heating time and prevents them from drying out or getting scorched from the bottom) cover the pan tightly with aluminum foil, and keep them in the oven at 250 degrees F until they are nice and hot. If you are pressed for time, you can start heating them for 10-15 minutes at 350 degrees F, then turn the temperature down to 250 F for a few more minutes until warm enough to serve.
For individual portions, it is easier and quicker to use the microwave, but remember to cover them and avoid overheating them so they don’t become rubbery and tough. Begin with 45 seconds, then check if they are warm enough for you. If you like them hotter, add 20 seconds once or twice.
To freeze them, you cool them first, coat them with butter/oil mixture, then either lay them flat on a cookie sheet and freeze, then store them in freezer zip-lock bags. You can also fill each bag with 12 pieces or fewer, close securely, label properly, and use within 3 months.
Before use, you need to defrost them in the fridge for at least 24 hours in their storage bag, then either warm them up in the microwave on a microwave-safe plate until heated through, or fry them in a frying pan with melted butter.
Adjustments:
Someone mentioned to me that they add softened butter to their dough during kneading, so I tried it, and it is such a wonderful change. It makes the dough so soft and pliable; therefore, I UPDATED my original recipe with this adjustment (March 2018).
Some of you mentioned that you used more flour than I did while kneading the dough, or during rolling it out, making the dough a little more dense than mine; therefore, I adjusted the total liquid used in the recipe by increasing it by 1/4 cup (total 1 1/4 cups).
However, depending on the humidity in the air or where you store your flour affects the flour quality and the amount of liquid needed to form a soft dough. This means you might need even more liquid than listed in the recipe. With time and experience, you will become more familiar with the feel of the dough and adjust the flour and liquid ratio as needed. For now, you need to remember that the dough needs to be baby soft, and once a ball of dough is placed on the edge of the palm of your hand, it should feel like it is slowly sliding off your hand. If it sits there like a rock, then it most likely is too dense, and additional liquid should be worked in.
This recipe makes about 60 pieces of varenyky (using a 3″ biscuit cutter) and rolling out the dough to less than 1/8 inch thickness.
### Please scroll down to the bottom of this post for a printable recipe ###
Start your dough on a countertop or in a large bowl. (I prefer using a bowl and then transferring the sticky dough to a well-floured countertop for kneading.)
Use a spoon to incorporate the wet ingredients with the dry ones, until a sticky dough is formed and ready for kneading.
 Once the dough is soft and silky (about 3-5 minutes), form a ball, cover it with a tea towel, and let it rest for 15 -30 minutes. If you used a bowl for mixing the dough, you can oil it with 1 tsp of oil, then place the dough in it and turn it once so that both sides get slightly oiled, which helps prevent it from drying out. Cover the bowl with a kitchen towel and rest as above.
 Use 1/2 of the dough at a time, and place it on a lightly floured work surface (countertop) for rolling out.
 Using a rolling pin, begin gently rolling out the dough from the middle towards the sides. Once your dough stretches out passed the floured area, gently use both hands to lift it, dust your work are with little bit of flour, lay the dough face down, sparingly sprinkle the top with little bit of flour (the current top is the previous bottom), and continue gently rolling it out until it feels about 1/8 inch thick or even thinner (thickness of two sheets of paper)
Use your flour sparingly for dusting the work area so your leftover dough after cutting out the circles does not get too dense for the next round of rolling out and cutting circles.
Using a 3-inch biscuit cutter, cut out circles from the rolled-out dough until all is used up.
 Place the circles on a floured tea towel, and cover them with another tea towel to prevent them from drying out before filling.
 After the second round of rolling and cutting out circles, the dough is usually too dense for varenyky, so I roll it out very thin and use a pizza cutter to cut it up into pasta, and leave it out to dry a little before cooking it once all the varenyky are cooked.


This is my pasta from the leftover dense dough.
When ready to fill, place a teaspoon of filling in the middle of a dough circle, or use a previously prepared walnut-size potato ball.
 Flatten the potato ball slightly, leaving enough room around the edge to allow for comfortable pinching together to seal it well. Fold the filled circle in half like a taco shell, and pinch the sides together well enough so they do not open up. Poorly sealed Varenyky will open up during cooking, and the filling will boil out. It is helpful to frequently dip your fingertips into flour during pinching to prevent your fingers from sticking to the dough.


Ingredients
- 4 cups flour (all purpose – unbleached Gold Medal or Pillsbury). You will need additional flour for dusting your work area while rolling out the dough.
- 1 tsp. Salt
- 1 egg (slightly beaten)
- 1 1/4 cup whole milk, room temperature (may add more warm water if needed)
- ½ cup sour cream
- 4 Tbs. butter, softened (to use during kneading)
- 8 medium potatoes (Yukon Gold, Red, or Idaho)
- 1/4 lb Yellow American Cheese (real cheese not cheese food)
- 1/4 lb White American Cheese
- 1/4 cup of butter
- 1 large onion, chopped and sautéed in 1/4 cup butter and 2 Tbs. oil
- Salt and pepper to taste
Instructions
- Begin with 3 1/2 cups of flour on your counter top in a mound, or in a large mixing bowl, making a well in the middle. Set aside 1/2 cup of flour to dust the work area before kneading the soft dough.
- Add the egg, salt, sour cream and butter into the well.
- Using a spoon, start incorporating the flour from the inside of the well, into the wet ingredients, while gradually adding milk and forming soft dough.
- If your dough is too firm you may continue to add a little more warm water and working it into the dough to make it more pliable.
- Flour the work area with the remaining 1/2 cup of flour, and place the sticky dough on it for kneading it for about 3 minutes. Do not over work it, so it does not get tough. It should feel like fresh pizza dough, but slightly softer.
- Place your dough ball on a floured section of a countertop, or in a oiled bowl, cover with a tea towel, and let it rest at least 15 to 30 minutes.
- Flour your work area, and roll out 1/2 of the dough,working from the middle to the sides. Halfway though this process, I use both hand to gently lift up my half rolled dough and flip it over onto the floured work area, and continue rolling it out until it is about 1/8 inch think. Make sure you keep the second half of the dough covered to prevent it from drying out.
- Using a 3 inch biscuit cutter, cut out circles from the rolled out dough, until all is used up.
- Place the circles on a floured tea towel, and cover with another tea towel to prevent them from drying out.
- Gather up the remnants of the dough from the cut out and form a new dough ball, and repeat the rolling/cutting out process, one more time.
- Gather all the remnants after this cutting, form to a ball and set aside for later to make it into pasta, because by now it is too dense for forming verenyky. Discard it if you do not want it for pasta.
- Repeat the process with the second half of the dough, which was resting during this time, until all used up.
- Now you are ready to fill your dumplings with your favorite filling, which needed to be prepared ahead of time, so it had a chance to cool off.
- Place a heaping teaspoon of filling in the middle of a dough circle, or roll your potato filling into ready to use balls, the size of a walnut.
- Fold filled circle in half, and pinch sides together well enough so they do not open up. If you do not seal them well, the filling will boil out during cooking time.
- Repeat the filling/pinching process until all circles are used up.
- Keep the finished Varenyky covered with a tea towel, until ready to cook.
- Fill 3/4 full a large pot (4 - 6 quarts) with salted water, 2 Tbs. oil, and bring to boil.
- Gently lower 8-12 Varenyky into the boiling water; be careful to avoid splashing hot water on yourself.
- Stir gently, with a wooden spoon, to prevent Varenyky from sticking to the bottom of the pot.
- After a short while the Varenyky will float to the top of the water. Do not cover the pot.
- Bring back to boiling point, and boil for 3-5 minutes, stirring occasionally. You will notice they will change its shape to become more puffed out and fluffy looking.
- Remove each one with a slotted spoon into a strainer placed over a bowl.
- Fill a large bowl with cold water, and empty the Varenyky into it, to cool them down for a few minutes, then pour out into the strainer again to let the water drain off. Then slide them off onto a large plate to cool off further. If you plan to store them for later, make sure you grease them well with butter/oil mixture, to prevent sticking during storing.
- By this time your water is boiling again, so repeat the cooking process until all Varenyky are cooked.
- Peel and quarter potatoes.
- Fill a medium size pot with water, add potatoes and bring to boil.
- Cook until done.
- Sauté onions in oil and butter, until golden.
- Drain water from cooked potatoes.
- Add sautéed onion, cheese and butter.
- Mash well to a smooth paste (no lumps)
- Since cheese is normally salty, taste the potatoes and adjust the salt and pepper at this time.
- Cool before using.
Notes
Filling: If your mashed potatoes are not firm enough to handle for the filling (even if you always use the same brand, sometimes they are just more watery) you can mix in a little bit of instant potato flakes or cook a couple of dryer type of potatoes such as Russet Baking potato, mash them without any butter and incorporate into your mashed potatoes. It is always better to prepare your potato filling the night before and keep it refrigerated. Bring to room temp before making the dough and form your potato balls while the dough is resting.
23 thoughts on “Homemade Varenyky/Perogy – Recipe & Technique”