Browse By


-->

Freshly Baked Garlic and Herb Bread – Dutch Oven Recipe

Garlic and Herb BreadI just baked another loaf of homemade bread, using the Dutch Oven (Cast Iron Pot with interior and exterior enamel, plus a lid).

The process is so simple, and the bread turns out awesomely delicious.

This time I got a little more adventurous, and modified the original recipe, to create a more flavorful bread.

I was a little skeptical at first, but once I noticed how nicely the dough was rising, and the aroma of garlic and herbs filled the air, I knew it will be a great success.

I will continue to experiment further with other ingredients, and keep you posted

### Please scroll down to the end of this post for a Printable Recipe ###


Whole Wheat Bread

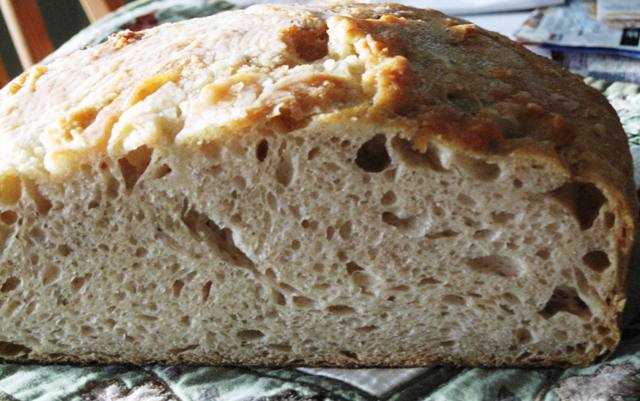
This is my first loaf of Dutch Oven Bread recipe, made with a mixture of whole wheat flour and unbleached all-purpose flour.

This loaf was light, but due to the whole wheat flour, it was not as airy as the other ones.

Bread Flour loaf

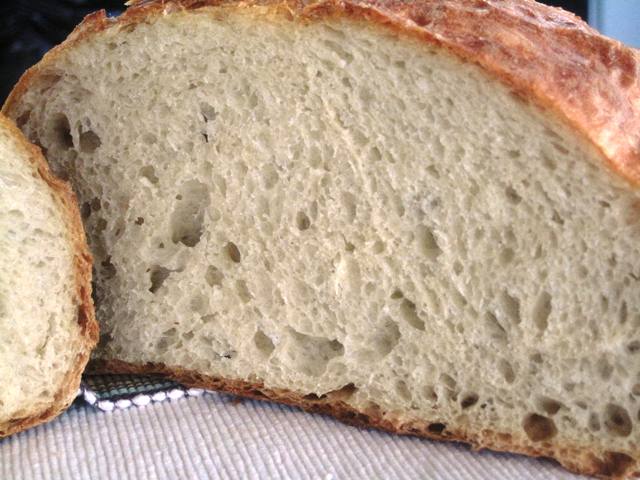
This is my second loaf, made out of bread flour, making it quite airy, and much lighter than the whole wheat loaf. Both breads were quite delicious, especially when served warm with a thin layer of sweet butter….yum!

Since these breads are totally fat-free, they tend to age quickly.  However, their delicious taste does not change, and warming them up in the microwave, or toaster oven, brings back their original freshness.

Today I will share my recipe for a Dutch Oven bread, with an addition of oil, egg, and herbs, giving it more flavor, and hopefully a longer shelf life.

Freshly Baked Garlic and Herb Bread – Dutch Oven Recipe

Freshly Baked Garlic and Herb Bread – Dutch Oven Recipe

Ingredients

  • 6 cups of Bread Flour
  • 2 1/2 tsp. Kosher Salt
  • 1/2 tsp. active dry yeast
  • 2 1/3 cups water, room temperature
  • 1/3 cup Olive Oil (or any oil of your choice)
  • 1 large egg, beaten
  • 1 tsp. Basil, dried
  • 1 garlic clove, minced (or 2, for more pungent results)

Instructions

  1. In a large mixing bowl, whisk together the flour, salt, Basil, and yeast.
  2. Set aside.
  3. Beat the egg, mix in Olive oil and minced garlic.
  4. Mix the egg/oil mixture with water, and stir into the flour mixture, to incorporate well to make a sticky dough.
  5. Cover the dough with plastic wrap, and keep in a warm, draft-free place (I keep it in a turned-off oven), for 12-18 hours, until light and bubbly (please visit the original site for step-by-step pictures).
  6. Flour your hands, and the work area, then remove the risen dough from the bowl, onto the work area.
  7. Keep on tucking the dough under, using as much flour as needed for your hands and the work surface, until you form a nice ball of dough.
  8. Place it on a well floured parchment paper, cover it with couple of clean linen kitchen towels, keep it in a daft-free area, and let it rise for 1-2 hours (it will double in bulk).
  9. At 1 1/2 hours of dough rising, turn on the oven to 425 degrees F and place the covered Dutch Oven in it, to heat it up.
  10. At the end of the 2 hours of dough rising, carefully remove the HOT Dutch Oven from the oven, pour 1 tsp of olive oil into it, and using a pastry brush spread the oil over the bottom and sides of the pot.
  11. Gently slide the dough off the parchment paper, into the oiled HOT Dutch Oven.  Replace the lid, and bake it for 40 -45 minutes.
  12. Remove the lid, and bake it for additional 10-15 minutes, or until the internal temperature of the bread reaches 200 degrees F.
  13. Carefully remove the pot from the oven, and cool it for 10 minutes, then remove the bread, and place it on a cooling rack.
  14. If yo wish, you may brush off most of the flour from the top crust of the bread, or leave it on, then brush some olive oil with a pastry brush, all over the top, sides, and bottom of the bread, and let it cool completely before slicing.

Notes

Once the bread cools off, the crust will be very crunchy, but it will soften up by the next day. You may store this bread on a counter in the Dutch Oven, or place it in a plastic zip-lock bag. This bread freezes very well, so you can either slice it all and freeze it to use couple of slices at a time, or freeze the whole piece. I sliced 1/2 of the loaf, and kept it on the counter, and froze the second half in one piece. To thaw the bread in one piece, for best results keep it in the plastic bag, and thaw is slowly in the fridge. Frozen slices may be microwaved, or warmed up in the Toaster Oven.

https://suburbangrandma.com/freshly-baked-garlic-and-herb-bread-dutch-oven-recipe/

3 thoughts on “Freshly Baked Garlic and Herb Bread – Dutch Oven Recipe”

  1. Pingback: Breads and Rolls – Baking with Yeast Recipes
  2. Trackback: Breads and Rolls – Baking with Yeast Recipes

Leave a Reply

Your email address will not be published. Required fields are marked *

This site uses Akismet to reduce spam. Learn how your comment data is processed.